似乎性能优化永远都是属于门户网站的事儿,与咱们小民无关?!
这种想法在网络技术高速发展的今天,似乎有点落伍了。如果你是专业从事互联网的技术人员,甚至是负责优化公司网站的专家,自己的小站也别忘记适当地优化一下.
好像只有雅虎的人平时谈论这个问题比较多,是因为雅虎发明了YSlow和一套检验网站性能的机制?如果你使用的是Firefox,可以安装YSlow,来查看自己网站的性能,根据提示进行优化.总结一下,作为个站,可以做的优化工作大概这么几个:
- 使用更少的HTTP请求;
- 使用CDN
- 把CSS放在页面顶部(放<head>里)
- 把JS放在页面底部(紧跟着放</body>前就行)
这里我主要来解决第2条–"使用CDN"的问题(先了解一下CDN是什么).Google真是个好东西,总能提供一些很实用的服务.我的CDN就是利用Google App Engine来搭建的.首先做一些准备活动,需要安装一些小程序到你的电脑上,配置一些文件,但这些工作只需要做一次,之后使用时只需要运行一下程序,就可以把文件同步到Google了.
简单描述下工作原理.SVN用过吧?这个类似.
建立一个文件夹,里面放你的文件和文件夹,修改一个配置文件,把里面的application name改成你自己的.
通过Google App Engine SDK同步你的这个文件夹到Google服务器上.类似SVN的update或check in.
我是在Mac下工作的,先说说在Mac下怎么做:
- Google App Engine是基于Python的,Mac和Linux的用户不用装,系统本身就支持.
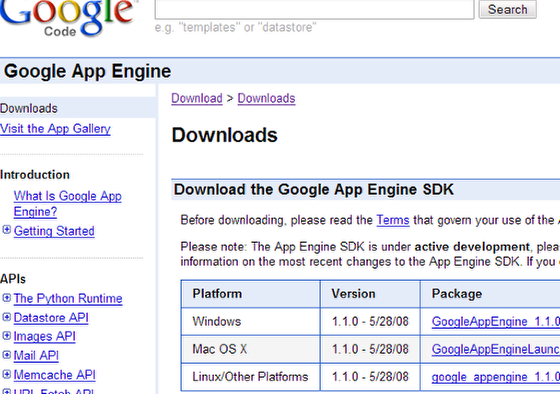
- 下载Mac版的Google App Engine SDK并安装,都使用默认安装就可以了.
- 在appengine.google.com登录.当然你要先有Google帐号,用你的Gmail帐号就行了,如果没有注册一个也不麻烦.
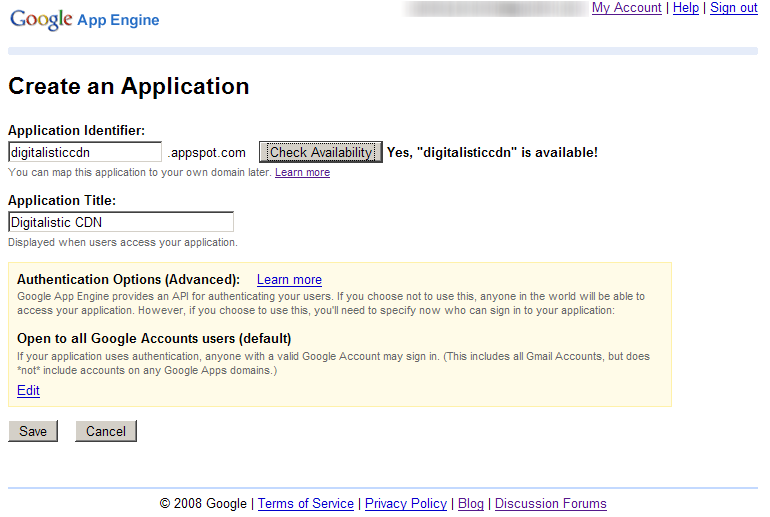
- 登 录以后,先点击"Create an Application"创建一个application,并给它取个名字.它必须是唯一且没被使用过的,所以我起的叫"b3insidecdn",既不 重复又好记.然后保存.第一次创建application时需要输入你的手机号码(形如:+8613800138000),用于接收Google发的确认 短信,确认你是Google App Engine帐号的主人.同时也为了防止spam,呵呵.
- 下载这个文件: http://b3insidecdn.appspot.com/files/b3insidecdn.zip,我把它解压后放在"GoogleApp"的文件夹里(当然,这个文件夹名随便起).
- 用文本编辑器修改app.yaml.把"application:b3insidecdn"改成你自己的"application:<你的application名字>"并保存.这个配置用来告诉Google App Engine你要上传的是哪些文件.
- 呼~ 现在把你要上传的图片, css, js, 甚至视频放到你本地的这个文件夹中.我把图片都放在/img里,别的文件也放在子文件夹里,方便管理,如/css/b3inside.com/style.css.
- 运行你安装的GoogleAppEngineLauncher.app,然后"File"-"New Application",按下图填写,端口不要用80,因为你机器上还有Apache在跑.之后点"Create"创建即可.
- 上一步将SDK和你本地文件夹做好连接后,就大功告成了.以后把要上传的文件放在你的文件夹里,通过GoogleAppEngineLauncher把它们Deploy到Google上就行了.
- 好了,快去访问一下你的CDN吧,看看它是否已经正常工作了.用这个地址:<你的应用名>.appspot.com/img/welcome.gif(我的是:b3insidecdn.appspot.com/img/logo_alpha.gif)
- 下载Python并安装.任何目录都可以.
- 下载Google App Engine SDK并安装,安装程序会自动检测你机器上是否已经安装了Python.
- 登录appengine.google.com.
- 创建新应用.
- 下载文件 http://b3insidecdn.appspot.com/files/b3insidecdn.zip,作为本地目录参考.
- 编辑app.yaml文件,修改application的名字.
- 把要上传的文件等放到这个文件夹中,待上传.
- 下载这个自动比处理文件http://digitalisticcdn.appspot.com/files/deploy_digitalistic_cdn.bat,用文本编辑器修改一下,替换成你自己的Python路径和Google App Engine安装路径(注意:路径必须用引号包围).需要同步你本地目录时,只要运行这个文件就行了.
- 都配置好后,双击deploy_digitalistic_cdn.bat来把你的文件上传部署到你自己的Google App Engine上.第一次运行需要输入你的Google用户名和密码.
- 大功告成.测试你的CDN是否运转正常的方法,和Mac版的一样.
P.S.需要告诉你的YSlow, appspot.com是你的CDN服务器,所以需要做以下配置:
- 在Firefox地址栏里输入 about:config
- 右键–新建–字符串
- 字符串的名字:
extensions.firebug.yslow.cdnHostnames - 值就可以写:appspot.com
-------------------------------------------------------------------------------
10 Easy Steps to use Google App Engine as your own CDN
When the big boys run websites (basically any brand name site you can think off) they use Content Delivery Networks (CDN's) to host most of their content, especially images, stylesheets, files to download and other static content. The reason they do this is that the less they have to host themselves the less load they have on their servers, and the more content they can host closer to the end user the quicker the user can download it. The most famous CDN is probably Akamai, that almost run their own parallell internet. Akamai and other CDN providers cost big bucks though, so it is nothing for us mere mortals.
But thanks to Google anyone can now run their own CDN for free on Googles servers. It is really easy to set up and storing files for downloads, stylesheets etc on Google instead of on your own site takes the load of your servers (and consumes much less bandwidth of your hosting account) and speeds things up for the end users. It's a win win situation, and it is also really really cool! If you are interested in more information about how to get the maximum performance from your web site then I recommend you read the excellent post Performance on a Shoe String on 24ways.
What is Google App Engine?
Using Google App Engine you can run web applications on Google's servers. That means that you can benefit from Google's huge world-wide server farms, it means that it is really easy to scale and to integrate with othe Google applications (for example using Google authentication in your applications). At the moment you have to write your applications in Python (don't worry: no coding at all needed to use Google App Engine as a CDN, just keep reading), but hopefully they will expand it to other languages soon (personally I want to run PHP and CodeIgniter on Google App Engine!). The App Engine is Googles response to Amazons very successfull web services S3 (for storage) and EC2 (for computing). Amazons services are very powerful, but they do require a deeper level of technical knowledge to use than Google App Engine.
Currently Google App Engine is in a Preview Release (= beta), but it is free for anyone to join, all you need is a Google Account and a cell phone (more about this later). What you get is 500MB of free storage and around 5 million free pageviews a month, if you use more than that there is a small cost (see the Google App Engine blog for more details). The cost for these extra resources are almost the same as for Amazons Web Services, and with the freebies and ease of use thrown in Google App Engine is a bargin.
How to set up your own CDN
To use Google App Engine as your own personal CDN you need to install some things on your computer and edit a few configuration files. All this work is a one time thing though, after that all you need to do is run a simple program to upload new files to Google. Sorry to say that the scripts you download is for Windows only, if you are on a Mac or using Linux then you need to make your on script to do what deploy_digitalistic_cdn.bat does (if you do so please add this to the comments of this post for any one else to use).
- Since Google App Engine only works with the programming language Python you need to download and install Python on your computer. If you have a Mac or run Linux you most probably already have Python installed, so you can skip this step. Download the correct installation file for your OS from Python 2.5.2 from http://www.python.org/download/ and install it. Use the default settings, except install it under "Program Files" instead of directly on the C: drive (or install it wherever you want, but in then you need to modify the scripts below.
Download the Google App Engine SDK from http://code.google.com/appengine/downloads.html and install it. During the SDK installation it will check if you have Python or not, so if you have a Python installation problem you will know it already here. The Google App Engine SDK is needed to be able to write and upload applications to Google. Just use the default settings when installing the SDK.
- Sign up for Google App Engine at appengine.google.com. For this you need a Google account (your GMail address for example, if you dont have one it is free to create one).
Once you are signed up you need to create an application, so just click on the button "Create an Application" and give your application a name (called "application identifier"). This name needs to be unique among all users applications, so it might take a while to find a unique one. In my case I used "digitalisticcdn". Save your new application. After you have created your first application you need to specify your cell phone number. Google will then send you a SMS with a code that you enter into their site. This confirms that you are the owner of this Google App Engine account (so don't use it for spamming
.
- Download the file http://digitalisticcdn.appspot.com/files/digitalisticcdn.zip (hosted on my private CDN!) and unzip it to your harddrive. If you want you can rename the unzipped directory from "digitalisticcdn" to whatevery you want, for example the name of your own application. It doesnt really matter, it just makes easier for you to keep track of things in the future.
- Use a text editor to edit the app.yaml file in the digitalisticcdn directory. Change "application: digitalisticcdn" to "application: <your application identifier" and save the file. This will tell Google App Engine what application to upload your files to.
- Now it is time to add all the images, stylesheets, files, videos etc you want to upload to Google to the folders in the digitalisticcdn directory. Put all images into the /images folder etc. You can create any number of subfolders inside the images, files, stylesheets etc folders (for example /images/webhostninja.com/ninja.gif). You can always add more files at a later time, so if you just want to set things up to work you can skip this step for now. There is already an image in the /images folder for you to test that all is working as it should be.
- Download http://digitalisticcdn.appspot.com/files/deploy_digitalistic_cdn.bat and edit it in a text editor. This file needs to point out your Python installation, your Google App Engine installation and your digitalisticcdn directory. If you installed the Google App Engine SDK in the default directory and Python in C:/Program Files/ then you don't have to worry about those settings. Just change the last part of the file to point to your digitalisticcdn directory. Keep in mind that all paths with spaces in needs to be surrounded by quotes.
- Double click on the newly changed deploy_digitalistic_cdn.bat file to upload all the files in the digitalisticcdn directory to Google. The first time you do this you need to specify your Google username and password.
You now have your own private CDN! Go to <your-application-identifier>.appspot.com/images/ninja.gif (in my case digitalisticcdn.appspot.com/images/ninja.gif) to see that it works.

To use the files you upload to your Google App Engine CDN you just need to use the URL to the file on your site. If you want to show an image of a cool ninja from WebHostNinja.com you would just use digitalisticcdn.appspot.com/images/ninja.gif as your image source in your HTML. The same goes for stylesheets, files to download or whatever else you want to share on your CDN.
At any time you can add new files to your digitalisticcdn subdirectories (/images, /stylesheets etc) and run the deploy_digitalistic_cdn.bat file to upload them to Google. If you remove files from your digitalisticcdn directory and then run the bat file they will be deleted from your Google application.
You can check the statistics of your Google Application at appengine.google.com. For example you can see how much bandwidth and disk space you are using. It will take quite a lot of files and usage for you to use up the resources you get for free, but if you have a super popular site then it is worth taking a look here every now and then。
from http://www.digitalistic.com/2008/06/09/10-easy-steps-to-use-google-app-engine-as-your-own-cdn/

没有评论:
发表评论